Saturday, December 21, 2013

On the sixth and seventh day of Christmas...

On the sixth and seventh day of Christmas my true love sent to me... 'Bolo Rei'... The king cake. 

A traditional Xmas cake in Portugal, was originally french and introduced to the portuguese during the 19th century. 

A cake with a hole in the middle, made from a white light dough filled with nuts, raisins and crystalized fruit. It will be hard to find a portuguese household that doesn't have this cake at Christmas! 

It's also part of the tradition to have a small toy baked into the dough... However this was banned due to it being a choking hazard and now you can find a fava bean instead. 

As time goes by the market evolves and some have explored that and have created different versions of this cake in a bid to attract those who don't enjoy this fruit cake... For those who don't enjoy crystalized fruit like myself, there is now a queen cake, a cake made with just the nuts and dried fruit. But some go further an choose to attract the chocolate lovers, a chocolate a vermicelli pumpkin king cake! 

My parents enjoy this cake a lot. Particularly on Christmas day, In the morning, toasted with butter. Christmas feels that one bit special... 

Want to try it this year? Here's how to make it... 

Ingredients
  • ½ Cup Candied Citrus Fruit
  • 3 T. Raisins
  • ½ Cup Pine Nuts
  • ½ Cup Walnuts
  • ⅓ Cup plus 2 Teaspoons Port Wine
  • 2½ teaspoon active dry yeast
  • ⅓ Cup plus 2 teaspoons milk
  • 3½ Cups unbleached flour
  • 1½ teaspoon salt
  • 7 Teaspoon unsalted butter, softened
  • ⅓ Cup plus 2 teaspoons sugar
  • Grated zest of 2 oranges
  • 3 eggs, beaten
  • 1 dried fava bean and Large Coin
  • Topping:
  • 1 egg yolk beaten with 1 teaspoon water
  • 10 candied cherries
  • 1 package of Natural Delights Medjool Dates
  • Powdered sugar for garnish

Instructions
  1. Soak candied fruit, raisins and pine nuts in Port Wine overnight or until plump.
  2. Sprinkle yeast into milk in bowl and let stand 5 minutes. Stir to dissolve.
  3. Mix flour and salt in large bowl.
  4. Make well in center and pour in dissolved yeast.
  5. Use wooden spoon to draw enough flour into dissolved yeast to form soft paste.
  6. Cover bowl with dish towel and let stand until “sponge” is frothy and slightly risen, about 20 minutes.
  7. In separate bowl, beat butter with sugar and orange zests until light and fluffy.
  8. Add eggs, 1 at a time, and beat well after each addition.
  9. Add mixture to flour mixture and mix in flour from sides to until dough is soft.
  10. Turn dough out onto lightly floured work surface.
  11. Knead until soft, smooth, silky and elastic, about 10 minutes.
  12. Knead in dried fruit and pine nuts until evenly distributed.
  13. Place dough into clean bowl and cover with dish towel.
  14. Let rise until doubled in size. We usually let it sit overnight, but as little as 2 hours is usually ok.
  15. Punch down, then let rest 10 minutes.
  16. Shape dough into ring and place on buttered baking sheet.
  17. Wrap dried fava bean or trinket separately in wax paper.
  18. Insert tiny package into bottom of shaped dough.
  19. Cover with dish towel and set aside until doubled in size, about 1 hour.
  20. To prepare topping:
  21. Brush dough with egg glaze and decorate with candied fruit and powdered sugar.
  22. Bake at 350°F. 45 minutes until golden.
  23. Cool on wire rack.
  24. Makes 1 Loaf
Source: http://familyfoodie.com/bolo-rei-the-king-of-christmas-desserts/

     Source: food52.com 

Have a merry bake!!!! 

Thursday, December 19, 2013

On the fifth day of Christmas...

On the fifth day of Christmas my true love sent to me... Eggnog!!!! 

I know I am running behind on my 12 days of Xmas, but things have been a bit crazy at home these past few days. 

But never mind that! Lets get back to what is important... Eggnog... The most alcoholic christmassey dessert-like drink I have ever had!!! My cousin is an expert at eggnog making and it was a staple drink at many of our Christmases. 

Last year I decided to give it a go for a Christmas  party and it turns out it takes a lot of skill to get it just right. I followed all of my cousins instructions and even then it seperated and didn't have the consistency it required. 

You have to be prepared for its sweetness and creamyness. I still find it hard to believe it is an aperitif drink rather than dessert! 

But give it a try. If you like your booze strong then you will be pleasantly surprised;) 

    Souce:www.marthastewart.com

Servings: 26 

INGREDIENTS

  • 12 eggs, separated
  • 1 1/2 cups superfine sugar
  • 1 quart whole milk
  • 1 1/2 quarts heavy cream
  • 3 cups bourbon
  • 1/2 cup dark rum
  • 2 cups cognac
  • Freshly grated nutmeg

DIRECTIONS

  1. STEP 1

    In a very large bowl, beat egg yolks until thick and pale yellow. Gradually add sugar to yolks. With a wire whisk, beat in milk and 1 quart cream. Add bourbon,rum, and cognac, stirring constantly.

  2. STEP 2

    Just before serving, beat egg whites until stiff. Fold into mixture. Whip remaining 1/2 quart heavy cream until stiff, and fold in. Sprinkle with nutmeg.

SOURCE: 
Martha Stewart Living, December 2000

Have a merry bake! 

Monday, December 9, 2013

On the fourth day of Christmas...

On the fourth day of Christmas my true love sent to me... Hot chocolate with a twist! 

Who doesn't enjoy a nice warm cup of hot chocolate? But a proper hot chocolate... Nice and smooth, with an intense flavour. 

I now see a lot more people getting in the mood for some, which in turn, has generated a buzz and a demand for it. So now around Porto you can find places that make really good hot chocolate. 

However you can get bored of hot chocolate really easily... Always the same(specially for me... I never take the risk and always stick to what I know). 

So this year I want to be bold and different... So I am making hot chocolate for adults!! 

I was looking for inspiration for my jar gifts(I've become slightly addicted to gifts in a jar), when I came across an interesting pin on pintrest for hot chocolate in a jar with Baileys.

   (Source: www.dodoburd.com) 

It was pinned from www.dodoburd.com and you can find other ideas for gifts in a jar as well. 

But I like to be diferent and since I live in the land of Port wine, why not make a port wine hot chocolate? 

Give these ideas a try!!! 

Have a merry bake! 

Saturday, December 7, 2013

On the third day of Christmas...

On the third day of Christmas my true love sent to me... Traditions! 

Every country has its Christmas traditions  and one of the good things of living abroad is getting to know people from all over the world and what these traditions are. I've learned a lot with all my friends... And one thing I've learnt is that these traditions also vary within each household. 

My Christmas traditions are different from my best friend's and we only live a few minutes away from each other. 

For example, most portuguese families celebrate Christmas Eve rather than Christmas day, my family is the other way round. 

We go all out on Christmas day with roast turkey with sides slightly diferent to what you are used to... Rice, broccoli dressed in a delicious mustard sauce, 'farofa'(toasted mandioc mixture), potato crisps, turkey stuffing and gravy. 

And don't get me started on the desserts... My favourite part of the meal! 

In Portugal most of our traditional bakes and sweets involve egg yolks, sugar and almonds. And at Christmas that is no different! We rely heavily on a sugar and cinnamon syrup to finish off our desserts, giving them that extra sweetness and making then even more appetising.

Then again this all varies within the household. In my family we can always count on a portuguese creme brulee(resembles more of a british custard), rice pudding, 'aletria'(just like rice pudding but made with angel hair pasta) and rabanadas(resembles french toast). One of the desserts that is required to be present in our Christmas is 'mexidos', my mum's speciality, a calorie bomb filled with bread, butter, eggs and dried fruit. Christmas isn't Christmas without 'mexidos'! 

We also have a portuguese version of the fruit cake. It's called 'bolo Rei' (king cake) , it's a light dough cake filled with dried fruit and crystalized fruit.

    (Source:www.caestamosnos.org)

These are my Christmas traditions and what are yours?  

Have a merry bake!! 

Wednesday, December 4, 2013

On the second day of Christmas...

On the second day of Christmas my true love sent to me... Greetings from Germany!! 

When you think of Christmas what's the first thing that comes to your mind? 

To me... Is the smell... The Christmas smell... Cinnamon and spices! 

And what concentrates all these aromas?! A german cookie called Lebkuchen! 

Lebkuchen, also called Pfefferkuchen, is German gingerbread. It's a traditional German soft cookie which has as its base molasses and honey and their aroma is a beautiful blend of spices, such as, nutmeg, cloves, and cinnamon. You will find many regional variations, but the most well-known is the NĂĽrnberger Lebkuchen.(www.germanfoodguide.com)

From my research, the original recipe is made with honey and molasses but I found some made with butter. 

And here is how you make it:

Yield: 18 cookies


prep time: 15 minutes (active) 2 hours (inactive)


cook time: 10-12 minutes


total time: 2 hours 45 minutes

For the Cookies:
3 cups all-purpose flour, plus extra for kneading
1¼ teaspoons ground nutmeg
1¼ teaspoons ground cinnamon
½ teaspoon ground cloves
½ teaspoon ground allspice
1 egg
¾ cup light brown sugar
½ cup honey
½ cup molasses

For the Glaze:
1 cup confectioner's sugar
2 Tablespoons water
1 Tablespoon lemon juice

DIRECTIONS:

1. Preheat the oven to 350°F. Grease two baking sheets or line them with parchment paper.

2. Sift together the flour, nutmeg, cinnamon, cloves and allspice. Set aside.

3. Beat the egg and sugar together on medium speed until light and fluffy, about 2 minutes. Scrape down the bowl.

4. Beat in the honey and molasses until thoroughly combined.

5. On low speed, stir in the flour mixture until just combined.

6. Turn the dough out from the bowl onto a well-floured surface. Knead the dough, adding more flour as kneaded, until a stiff dough is formed.

7. Wrap the dough in plastic wrap and chill until firm, about 2 hours or overnight.

8. On a well-floured surface, roll out the dough into a 9x12-inch rectangle. Cut the dough into 18 3x2-inch rectangles. Bake for 10-12 minutes.

9. Transfer the cookies to a wire rack and let cool. Whisk together the confectioner's sugar, water and lemon juice and brush or spread on top of the cookies.

10. Allow the glaze to firm, and then store the cookies in an airtight container at room temperature.

(Source:www.browneyedbaker.com)


This is how mine turned out. I used Betty Crocker's recipe and made a slight change... I don't have allspice so I added a little bit of ginger to the mix and I also removed the chopped nuts, as I thought it didn't add much to the cookies. The icing of these cookies vary... The recipe above gives you a glazed icing.I prefer a chocolate icing, which is also a delicious option. Just melt dark chocolate and glaze to taste(you can also add a sugar syrup to the chocolate to thin it out). 

Also give Martha Stewart's Lebkuchen a go. 

Give it a try! Have a merry bake! 


Monday, November 25, 2013

On the first day of Christmas...

On the first day of Christmas my true love sent to me... Peppermint candycanes!! 

And so she did. One of my closest friends, lets call her Miss.SuperEfficientGiffney, has mailed me an immense amount of candycanes! Which I am thrilled about! 

They are just a delicious candy on its own but you can also make many amazing treats with it. You can really put candycanes into everything. 

Say for example... Peppermint chocolate bark
Extremely delicious and easy to make! Nothing but chocolate(I used dark chocolate and white chocolate to give it some contrast) and crushed peppermint candycanes. The peppermint in the chocolate makes it so refreshing. 

I also found out through my experiments that peppermint meringues dipped in dark chocolate are delicious! 

    Source: www.bhg.com 

Get your favourite recipe for meringues (make sure you beat the mix well as it makes them stiffer) and switch its flavouring for peppermint candycanes. I crushed the candycanes roughly, you don't have to turn them into powder but you don't want very big pieces of it either. 

Bake them on parchemant paper or wax paper, they won't stick as much and it will be easier to remove them from the tray. I also like to undercook them, this makes them chewy but that is up to you and how you like your meringues. 

Last but not least, I dip them in dark chocolate. This process requires some patience as the meringues are very delicate and break easily. 

There are so many possibilities! 

Not in the mood for baking but feel like having something yummy and delicious? Try a nice hot chocolate and to make it that bit more delicious stir it with a peppermint cane :) 

Have a merry bake! 

Wednesday, November 6, 2013

Pumpkin madness series

I never knew there were so many sweet things I could make with pumpkin! 
I'm glad there are so many pumpkin lovers out there:) 

This time round I went for a recipe I had never seen... Pumpkin and chocolate chip bars. Pumpkin and chocolate?! Are you sure?! Lets see what Niki Segnit has to say about this flavour combination in her 'The flavour Thesaurus' (it's my bible)... Nothing. A flavour combination the book doesn't cover! Only one way to find out... Bake it! 

The veredict? I loved it!!! The pumpkin gives the bars a wonderful moister just like a carrot cake. And the chocolate? Delicious with pumpkin! 

I took some bars to work, my colleagues never say no to cake:p and it was a hit! Everyone seemed to enjoy it a lot. At home opinions were devided.. My dad loved it, my mum? Not much. But I became a fan and this recipe is a keeper. 

I took it from twopeasandtheirpod.com website. 

Here is the recipe: 

Pumpkin Chocolate Chip Bars 

Ingredients: 

2 cups all-purpose flour 
1 tablespoon pumpkin-pie spice 
1 teaspoon baking soda 
3/4 teaspoon salt 
1 cup (2 sticks) unsalted butter, at room temperature 
1 1/4 cups granulated sugar
1 large egg 
2 teaspoons vanilla extract 
1 cup canned pumpkin puree(not pumpkin pie filling) 
1 package(12 ounces) semisweet chocolate chips

Directions: 

1. Preheat oven to 350 F (180C). Grease a 9-by-13 inch baking pan and set aside. In a medium bowl, whisk together flour, pumpkin pie spice, baking soda, and salt: set aside. 

2. With a stand or electric mixer, cream butter, and sugar on medium-high speed until smooth; beat in egg and vanilla until combined. Add pumpkin puree and mix well. The mixture will look somewhat curdled. Reduce speed to low, and miz dry ingredients until just combined. Fold in chocolate chips. 

3. Spread batter evenly in prepared pan. Bake bars for 35-40 min or until edges begin to pull away from sides of pan and a toothpick inserted in center comes out with just a few moiat crumbs attached. 

4. Cool bars completely in pan. Cut into squares and serve. 


I always use salted butter so I never put in the salt. I also use my homemade vanilla extract(check out my 'vanilla vanilla vanilla' post on how to make it). 

Give it a try!! Bake away...   


Monday, October 28, 2013

Pumpkin mad series

As soon as I got my big chunk of pumpkin, I couldn't wait to get to work and start experimenting with recipes! 
And I am one lucky gal... I seem to have magical baking helpers because  when I left the house in the morning the pumpkin still needed to be chopped and peeled, when I got back it was ready to be cooked! Amazing :) 

This time round I followed my aunt's advice and steam cooked my pumpkin. The pumpkin already has so much water so if you steam cook it helps it not retain anymore water. However you still have to leave it overnight to drain the excess water. 

For my first recipe I decided to go for a classic that I love, pumpkin pie. To me Autumn only starts when I've had a slice of this good ole pie! 

My sister is also a big fan of pumpkin pie and I remember once my aunt wanted to make it for us (she knows how much we love it) and was all excited with this new recipe she had found(also a big fan of trying out new recipes) because it didn't use sugar! Well she could see it on our faces that it was a typo error because the pie definitely needed sugar!!  

So for my pumpkin pie I tried the Good Houskeeping cookbook 'Pilgrim pumpkin pie'. 


I enjoyed this recipe, although I think it lacks in flavour, partially because of the pumpkin I used. It wasn't very flavoursome but I think the pie could do with more spices. 

Well I'll let you have a go at it and see what you think! 

For the pie crust: 

1 1/4 cups all-purpose flour 
1/4 teaspoon salt 
4 tablespoons cold butter, cut into pieces 
2 tablespoons vegetable shortening 
3 to 5 tablespoons ice water 

1. In large bowl, with wire whisk, stir flour and salt. With pastry blender or two knives used scissor-fashion, cut in butter and shortening (I don't have shortening so I just added the same amount of butter) until mixture resembles coarse crumbs. 
2. Sprinkle ice water, 1 tbsp at a time, mixing lightly with fork after each addition, until dough is just moist enough to hold together. 
3. Shape dough into disk; wrap in plastic. Refrigerate 30 min or up to overnight. (If chilled overnight, let stand 30 min at room temperature before rolling.) 
4. On lightly floured surface, with floured rolling pin, roll dough into 12 inch round. Ease into a 9-inch pie plate, gently pressing dough against side of plate. 
5. Make decorative edge as desired. Refrigerate or freeze until firm, 10 to 15min. 
6. Preheat oven to 425 F (220 C). Line pie shell with foil; fill with pie weights or dry beans. Bake for 15min. Remove foil with weights; bake until golden, 5 to 10 min longer. If shell puffs up during baking, gently press it down with back of spoon. Turn oven to 375 F ( 190 C). 

Pie filling: 

1 can (15 ounces) solid-pack pumpkin (not pumpkin-pie mix) or 2 cups mashed cooked pumpkin 
1 can (12 ounces) evaporated milk
3/4 cup packed brown sugar 
2 large eggs 
1 teaspoon ground cinnamon
1/2 teaspoon ground ginger 
1/2 teaspoon salt 
1/4 teaspoon ground nutmeg 

1. In large bowl, with wire whisk, mix pumpkin, evaporated milk, brown sugar, eggs, cinnamon, ginger, salt, and nutmeg until well combined. 
2. Place piecrust- lined pie plate on oven rack, carefully pour in pumpkin filling. 
3. Bake until knife inserted 1 inch from edge comes out clean, about 50min. Cool on wire rack at least 1hour or up to 6hrs. Makes 10 servings 

Eh voilá!! Enjoy! 


Sunday, October 20, 2013

Going pumpkin MAD!!!!

I am embarrassed... I am sorry!!!! I have left you hanging, waiting for another post and nothing!!!!! there is no excuse.... but... I am back!!!!!!

And back with a bang! It's Autumn! which means... an overload of pumpkin, chestnuts, apples and my favourite Cinnamon!

I have been eagerly awaiting for my aunt to share some of her pumpkins with me so I can go crazy and try all these different pumpkin recipes. However this year, due to weather conditions, her pumpkins didn't grow and only a small amount grew:(

But do not loose hope! the advantages of living in the countryside and having a farm is that you will most certainly have neighbours and friends with farms of their own. So My aunt received two huge pumpkins and gave a massive chunk of one of them to me:D Thank you auntie for your kindness!

Look at this beauty...

Now what to do with it? so many ideas!!! where to start... pumpkin pie?

Let's bake!!!

Monday, July 8, 2013

Busy Busy Bee

Wow I have been a busy bee!!! I have been making so many cakes it's amazing :D

Cake design is on demand! I have been making so many cakes it's crazy!!! Oh and I do love making them... my skill for cake decorating came as a surprise to me because when I started baking I had no intentions of going into the decorating side of things. Plus that was my mum's thing, she always made us amazing cakes for our birthday (so amazing I never let anyone destroy the cake:P). And since I had no training I didn't think I could do it.

Well one day I decided my sister needed a special cake for her 21st birthday and what better design than her (our) favourite animated film 'The nightmare before Christmas'. So I pictured in my head the cake and came up with a simple but super cute cake! And it turned out I actually had picked up the hang of it just from watching my mum all those years.


And here is what I have been up to since my last post... busy bee :) 
Made this mini cooper was for my cousin's 18th Birthday.


Thursday, May 16, 2013

Peach Melba...

Back in April we had a big event in our Hotel... an event that brings together many Michelin star chefs . It is called 'Rota das estrelas' (The stars' route). A three day event that showcases wonderful creations, paired with amazing wines.

This year we all got to participate on the event, which I was very excited about! to get a chance to see all the amazing creations these chefs came up with was an honor. I love seeing all the different courses, their colours, their plating... it's incredible!!! But as usual I paid more attention to dessert ;) always keep a close eye on the grand finale... And let me tell you, I saw one of the best things I've seen so far. I can honestly say it was a true Heston Blumenthal styled dessert.

The dessert was described as follow... 'Peach Melba, a tribute to Auguste Escoffier'. Auguste Escoffier an important reference for all culinary enthusiasts created this dessert in the late 1890s whilst working in London at the Savoy hotel and was named after opera singer Nellie Melba. After some adjustments, the final version of the dessert was presented whilst Escoffier was working at the Ritz Carlton London to what is now known as the Peach Melba (http://www.pbs.org/food/the-history-kitchen/opera-escoffier-and-peaches-the-story-behind-the-peach-melba/). A dessert that brings together flavours such as, peach, vanilla and raspberry.

As a result this tribute incorporated all three aromas in an innovative and smart way, playing with the senses...

Source: https://www.facebook.com/photo.php?fbid=551016248276297&set=a.548715041839751.1073741827.145883738789552&type=3&theater

A white chocolate sphere spray painted to mimic a peach, filled with a wonderfully light peach mousse; To balance the sweetness of the chocolate, a delicious peach sorbet was complemented with a raspberry coulis, a peach coulis and a vanilla concentrate. Beautifully presented on the plate, making you want to explore every single element on there as carefully and slowly as possible.

A treat both to the eyes and your mouth!!! 

I can honestly say... I'm in Love!!!!! 

Here is the original recipe for Escoffier's Peach Melba: 

Serves 6 

Ingredients: 

  • 6 ripe, tender peaches
  • Sugar
  • 1 ½ pints vanilla ice cream (fresh homemade is best)
  • 1 heaping cup fresh ripe raspberries
  • 1 heaping cup powdered sugar
  • 6 tbsp blanched raw almond slivers (optional)

Directions: 

  1. Boil a medium pot of water. Keep a large bowl of ice water close by. Gently place a peach into the boiling water. Let the peach simmer for 15-20 seconds, making sure all surfaces of the peach are submerged. Remove the peach from the boiling water with a slotted spoon and immediately plunge it into the ice water for a few seconds to cool. Take the peach out of the ice water and place it on a plate. Repeat the process for the remaining peaches.
  2. When all of the peaches have been submerged, peel them. Their skin should come off easily if they are ripe, thanks to the short boiling process. Discard the skins. Halve the peeled peaches and discard the pits.
  3. Optional Step: Place the peeled peaches in a large bowl of cold water mixed with 1 tbsp fresh lemon juice or ascorbic acid powder. Let the peach halves soak for 10 minutes. Drain off the water and gently pat the peach halves dry with a paper towel. This step will help to keep the peaches from oxidizing and turning brown.
  4. Sprinkle the peach halves with sugar on all exposed surfaces. Place them on a plate in a single layer, then place them in the refrigerator for 1 hour to chill.
  5. Meanwhile, make the raspberry purée. Place the raspberries into a blender and pulse for a few seconds to create a purée. Strain purée into a bowl through a fine-mesh sieve, pressing down on the solid ingredients and agitating the mixture with a metal spoon to extract as much syrupy juice as possible. It will take a few minutes to extract all of the juice from the solids. When finished, you should only have seeds and a bit of pulp left in the strainer. Dispose of the solids.
  6. Sift the powdered sugar into the raspberry purée, adding a little powdered sugar at a time, and whisking in stages till the sugar is fully incorporated into the syrup. It will take several minutes of vigorous whisking to fully integrate the powdered sugar into the syrup. Refrigerate the raspberry syrup for 1 hour, or until chilled.
  7. Assemble six serving dishes. Scoop ½ cup of vanilla ice cream into each serving dish. Place two of the sugared peach halves on top of each serving of ice cream. Divide the raspberry sauce between the six dishes, drizzling the sauce over the top of the peaches and ice cream. Top each serving with a tablespoon of raw almond slivers, if desired. Serve immediately.

Tuesday, May 7, 2013

Absence...

I can't believe my last post was over a month ago!!! what is wrong with me?!
I guess I can catch you up in all my culinary adventures ;)

It seems cake design has become sort of a trend in Portugal... everyone wants a decorated cake to celebrate special occasions. So I've been having quite a few cake orders.

One of my cousins turned 18 this year and in Portugal that is the birthday you go all out and do big celebrations. So I was asked to do her cake:) Of course I went all out and created the best cake ever!!

I put together a few elements I was told she liked... eh voilá!!!

A Mini Cooper with destination Rome!!! It turned out so good! It took me a long time to do this cake, it required a lot of measuring and precision.

For the cake I made a simple orange butter cake with an orange buttercream. On top, I covered the cake with fondant, lots of it! I buy all my fondant already dyed, it works out cheaper and less time consuming.


Friday, March 22, 2013

Back for good ;)

My apologies for not posting on the blog for so long!!!

Things have been crazy in my life and I have let myself get sucked into all the turbulence around me. As a result, in some ways I have shut down, so I stop sharing with the world and keep my thoughts to myself.

But I am back and ready to let you know of all my baking adventures :)
I want to create a new trend... something cute and delicious. Well it's not new but not very popular here... mini cupcakes!!!!!

They are such a good alternative to a regular size cupcake. Bite size cupcakes makes it easier (and less awkward) to eat at parties, the kids love it(no need to take loads of bites to finish it) and if you are on a diet you can have one and not feel as guilty!


They look so adorable!! And you can make your favourite cupcake this size and keep all its flavour :) Bare in mind that the cupcake size is smaller and requires less time in the oven so it doesn't dry out.

Tuesday, February 26, 2013

It's time to Party!!!!

How was your weekend? Mine was Awesome!!!

So I overcame my cake dilemma... it took me a while to come up with the perfect cake! But after a lot of searching I finally made my decision (I take forever to make a decision... I always over think things) and found the cutest cake! Following a picture I found online, I adapted the cake and made it mine:)

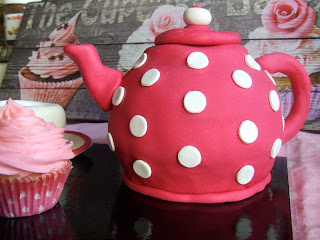
And here is my beautiful cake...

Tea for one?! I love love love it!!!
When I started considering doing this cake a few issues came up. One of which was related to humidity... the weather here in Porto was terrible and we had way too much rain. As a result my house was very humid which makes it very hard, well nearly impossible, for the fondant to dry. But I really wanted this to be my cake so I tried all the tricks in the book to make it work.


To all the fondant pieces that required to be fully dry to hold I added powdered CMC and placed wire inside them to keep them stuck to the cake. I then ensured I had the heating on in my bedroom to dry the air and left them in there to see if they dried quicker. Luckily the weather changed completely and the cake came out a success!

I also had to change the cake batter from carrot cake to a vanilla and chocolate chip cake because I was afraid the lightness of the carrot cake wouldn't hold the teapot structure and height. And to make it my own I had to go for Polka dots ;) It looked amazing and I was very proud of how it turned out!

And you know your cake is good when your friend walks in and asks 'show me the cake! I'm very curious to see what you made!' and you reply 'you just walked past the cake... it's in the middle of the table!' hehehe

I had an amazing party surrounded by friends and family. A truly amazing Birthday! Thank you!!!!! 

Monday, February 18, 2013

It's my party...

Another Valentine's day gone by... How was your day?

Mine was spent working and then I had a wonderful dinner with amazing people:) We had so much fun !!

This year I had less orders for Love day, but it was good because I got a chance to focus more on those orders and create some gorgeous and delicious cupcakes.

And look at what I created...


A cute couple in love having a cuddle :D

It turned out to be so easy and quick to make! And definitely worth making just for the expressions on people's faces when they saw the cupcake.

Now that love day is over I have to focus my attentions on a very special cake... Mine!!!! but unbelievably I have no ideas for my OWN cake!! How is that possible?!

Well lets just hope I get a burst of inspiration in time for my party!!!

Tuesday, February 5, 2013

Love is in the air...

And it's February... can you feel the love floating around?! Valentine's Day is just around the corner. 

Although I am not a big fan of the day, I do enjoy being busy and preparing yummy creations for others to enjoy and celebrate the day. It does feel nice to be surrounded by red, pink and hearts, but to be honest I'm not the most romantic person in the world!!! 

So today I spent the day in the kitchen creating some delicious goodies for others to share :D 

After the success of the chocolate lollipops I made for Christmas, I decided to make some for Valentine's. 

Some of these were made with raspberry flavoured dark chocolate, which turned out really good and others were made with dark chocolate and candy melts. They look really good!! and I hope they taste amazing :) 

Give them a try! they are so easy and fun to make. Kids will love to help make them and will definitely enjoy eating the end result. You can also use candy melts to add detail to them. I used a mix of candy melts, marshmallows and other type of candy. 

Tuesday, January 22, 2013

It's raining it's pouring...

The weather in Portugal has been terrible!!! we had a big storm over the weekend (lots of trees fell and many things were damaged) and it was not fun having to move around to get to work!

Although it seemed like it was going to get better, it hasn't... still a lot of rain and wind to mess up my new hair do :P

But you have to look on the positive side of things, always. So this weather always makes me think of cozy fireplaces, watching TV all day and the best part... HOT CHOCOLATE! when it's done properly it is so smooth, dense and delicious. To me the gooeyness of the drink is what makes it so appealing. Also I prefer the dark chocolate ones but through my research I've seen there is a recipe for every taste.

If you live in Porto and can't be bothered to make your own you should definitely try a hot chocolate from Casa Grande Chocolatier in Matosinhos (http://www.facebook.com/pages/Pot-Bar/257946557552552?fref=ts#!/CGmatosinhos?fref=ts). It is delicious and the fact that the shop is covered in chocolate, leaving that wonderful cocoa aroma in the air, is an added bonus!

If you are feeling adventurous, and don't feel like venturing the inclement weather, why not try to make it yourself? Jamie Oliver says he as an 'Epic hot chocolate'(jamieoliver.com). With that name i would be up for trying it.

Here is his recipe:


Ingredients

  • 2 pints semi-skimmed milk
  • For the epic hot chocolate mix

  • 2 tablespoons Horlicks
  • 2 tablespoons cornflour
  • 3 tablespoons icing sugar
  • 4 tablespoons quality organic cocoa
  • 100 g good-quality dark chocolate (70% cocoa solids), finely grated
  • 1 pinch ground cinnamon
  • 1 pinch sea salt


Method

Pour the milk into a large pan, and bring almost to the boil over a medium heat.

Meanwhile, add all the chocolate mix ingredients to a large jar and give it a good shake to combine. You need around 10 heaped tablespoons of the chocolate mix for this amount of milk. Simply spoon the chocolate mix into the hot milk, give it a good whisk and leave to bubble away for a few minutes before serving. You're looking for that gorgeous, thick, almost claggy, knockout texture.


You can also find a variety of recipes on Martha Stewart's wonderful site :
There is a recipe on here that caught my eye... Peppermint Hot chocolate... yummy


 source: www.marthastewart.com

Tuesday, January 15, 2013

Happy New Year!!!!!

I think I'm still in time to wish you all a Happy 2013!!! may the best of 2012 be the worst of 2013!

My apologies for such a big break on my posts but all the xmas work and preparation wore me off!! I hope you partied your to 2013 and that you made New Year resolutions. I made one... the only one I feel I need to follow and accomplish... To start taking risks again. Since I broke my arm I became afraid to take risks and to follow my dreams. So with all that has been going on with my life I need to change and fight for what I want!

So I will definitely keep baking and making sweet goodies for all :D

To help me grow as a baker I have started doing a cross-training in the bakery of the hotel I work for and I have been having fun and learning a lot. It's interesting to see how different professional baking is from home baking. The things you have to consider from taste, presentation and most of all how to make it easy to assemble the dessert before service. It's so different from baking a cake at home!

Well I hope I learn lots of new things so that I can apply it to my home baking.

This week I saw a photo from a good friend of mine (on facebook), who is also a home baker, and I can tell you I was very very jealous of her!!!! She has received and gorgeous pink... very pink KitchenAid!!!! one day... one day :P

source: www.google.com


And now I ask... KitchenAid or Kenwood?!